Archive
Installing and configuring SharePoint 2013
There are many guides on configuring SharePoint manually, automated with PowerShell, and so on. And here’s another one ![]() . This is not a fully detailed blog (easy reading), but rather to have you take pause and get the basics ready before mounting that iso.
. This is not a fully detailed blog (easy reading), but rather to have you take pause and get the basics ready before mounting that iso.
Installing SharePoint is one thing, but before you jump straight in, we want to plan for:
- Service accounts
- SQL configuration
- Local server configuration
- Patch management
If you are doing a production install, then you will want to do full architecture planning for hardware requirements, capacity planning, load balancing, service continuity, etc. We’ll keep that for another post ![]() .
.
Getting ready…
I see time and again users jumping straight into SharePoint install by mounding the iso, and clicking Install SharePoint. Even if you are setting up a test or developer environment, it is worth doing right.
Before we get started in mounting the iso, we want get a few things taken care of first. We need a few service accounts, we need to do some SQL configuration, and we need to get our SharePoint server(s) ready.
Hardware Requirements
TechNet has a post on hardware requirements that should be reviewed. While these are good minimums, I typically increase their recommended memory allocation by at least 50%.
If you are building out a dev/personal environment, you want to give it 8Gb if you can, and 60-80Gb for OS drive.
For SQL, again if it’s a dev environment, you can get away with 4Gb, but for a production you want to start at 24Gb.
If you are planning to install SQL on the same server as SharePoint then you would need to account for this in your memory allocation. I would never recommend that you do this, unless it is a very simple kick-the-tires situation.
Service Accounts
I have another blog on recommended service accounts for SharePoint, so no need to get into the details here. To get our installation complete and farm configured we are going to need at least the following:
- Farm account
- Install account
- SQL service account
SQL Configuration
To get our SQL server ready for SharePoint, we need to do the following:
- Set permissions
- Set max degree of parallelism
- Setting SQL permissions

- After installing SQL and setting it up using the sql service account, we need to give our SharePoint install account permissions to:
- Create database
- manage permissions
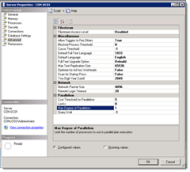 Set Max degree of parallelism
- See this post on setting this property.
 Configure Firewall
In order to allow the SharePoint server to connect to SQL, you may need to configure the windows firewall to allow the connection. SQL connections are made over port 1433.
Preparing the SharePoint servers
So we have our service accounts and SQL server setup, all we need is to prep our SharePoint servers and we are good to go.
To get our SharePoint servers ready we need to:
- Set local permissions
- Install utility software
- Install prerequisites
- Set local permissions
Tempting as it might be to just use the domain administrator account to install SharePoint, do not. Now is the time to start getting into the habit of using dedicated functional accounts.
Give your install account local admin permissions so it can logon and do the SharePoint install.
Install Utility Software
This is not a requirement, but there are a few utilities I like to install:
If you have any other recommendations, please let me know in the comments!
Installing the prerequisites 
SharePoint needs a bunch of installs on the server before we can actually lay down the SharePoint bits. Luckily, the prerequisites installer provided with the SharePoint iso takes care of installing and configuring them all.
Mount the SharePoint iso and start autoplay. Click Install software prerequisites to get them installed.
 Once the prerequisites are installed, we can proceed with SharePoint by clicking Install SharePoint server.
You will likely have to restart the server after the prerequisites. If you are mounting the iso from another file share, you should make sure that the mount point is re-established so the prerequisite installer can continue. If it cannot find the mount point, it will throw an error on restart. If that happens, simple remount the iso then run the following command from the root folder of the mounted drive:
prerequisiteinstaller.exe /continue
Install SharePoint Server
Ok, you made it. You are ready to install SharePoint!!
Back at the SharePoint 2013 splash, click Install SharePoint Server to get rolling.

[Should determine target file location before installing]
After SharePoint is installed, we are then ready to configure. When the installer opens the Run Configuration Wizard page,
Configure SharePoint

Rather than use the SharePoint configuration wizard, we will use PowerShell to configure the farm. In the past, I have run a custom script to configure the farm to Central Admin (and then separate scripts to configure services). There are many blogs out there covering that topics, but I recently discovered AutoSPInstaller (thanks Jody Finch ![]() ). I have yet to try it, but it looks promising!
). I have yet to try it, but it looks promising!
Patch Management
After getting everything installed and configured, check your windows updates. At time of writing, the March PU (public update) was available for download. See TechNet for more details.
Review
So, to recap… before getting stuck into your install, you need to:
- Plan and provision your service accounts
- Get your servers ready
- Get SQL ready
- Install and configure
- Get your updates on
Good luck!
